 Save
Save The skillet was still warm from breakfast when I decided to try turning leftover chicken parm into something I could eat in the car. I had twenty minutes before a meeting and a craving that wouldn't quit. What started as a messy experiment with a tortilla and some reheated cutlets turned into one of those accidental wins you keep making on purpose. Now it's my go-to when I want comfort food without the fork and knife ceremony.
I made these for my sister's game night last spring, and they disappeared faster than the pizza we ordered as backup. Everyone kept asking if I'd picked them up from some secret Italian deli. The best part was watching people go back for seconds, then thirds, without any of the awkwardness of serving themselves pasta. It felt like I'd cracked the code on crowd-pleasing food that actually stays warm and handheld.
Ingredients
- Boneless, skinless chicken breasts: Slicing them horizontally into thin cutlets is the key to quick cooking and even breading coverage, plus they fit perfectly in a tortilla.
- All-purpose flour: The first layer that helps the egg stick, creating that foundation for a seriously crispy crust.
- Eggs: Beaten eggs act like glue for the breadcrumbs, and I learned to let excess drip off to avoid clumping.
- Italian-style breadcrumbs: The seasoning in these saves time, but plain breadcrumbs work if you add a little extra garlic and herbs.
- Grated Parmesan cheese: Mixed into the breading, it adds a nutty, salty punch that makes each bite more interesting.
- Garlic powder, dried oregano, salt, and black pepper: These simple seasonings bring the Italian-American vibe without needing a spice cabinet raid.
- Vegetable oil: Just enough for shallow frying, which gives you that restaurant-quality crisp without deep-frying mess.
- Large flour tortillas: Burrito-size tortillas are essential here, anything smaller and you'll be wrestling with overflow.
- Marinara sauce: Use your favorite jarred or homemade version, the sauce is what makes this taste like the real deal.
- Shredded mozzarella cheese: It melts beautifully and adds that gooey stretch everyone expects from chicken parm.
- Fresh basil leaves: Optional but worth it, they add a bright, herbal note that cuts through the richness.
Tired of Takeout? 🥡
Get 10 meals you can make faster than delivery arrives. Seriously.
One email. No spam. Unsubscribe anytime.
Instructions
- Prep the Chicken:
- Slice each chicken breast horizontally to create four thin cutlets, keeping your knife parallel to the cutting board. This makes them cook faster and fit the wrap better.
- Set Up Your Breading Station:
- Arrange three shallow dishes in a row with flour in the first, beaten eggs in the second, and the breadcrumb mixture (combined with Parmesan, garlic powder, oregano, salt, and pepper) in the third. This assembly line makes breading smooth and keeps your hands from turning into dough.
- Bread the Cutlets:
- Dredge each cutlet in flour, shake off the excess, dip it in egg, then press it into the breadcrumb mixture, making sure both sides are well coated. Let them rest on a plate for a minute so the breading sets.
- Fry Until Golden:
- Heat the oil in a large skillet over medium-high heat until it shimmers, then fry the cutlets for 3 to 4 minutes per side until they're golden brown and cooked through. Transfer them to paper towels to drain, and resist the urge to flip them more than once.
- Wipe and Warm:
- Wipe out the skillet and warm your tortillas in a dry pan or microwave until they're pliable and easy to fold. Cold tortillas crack, and nobody wants that.
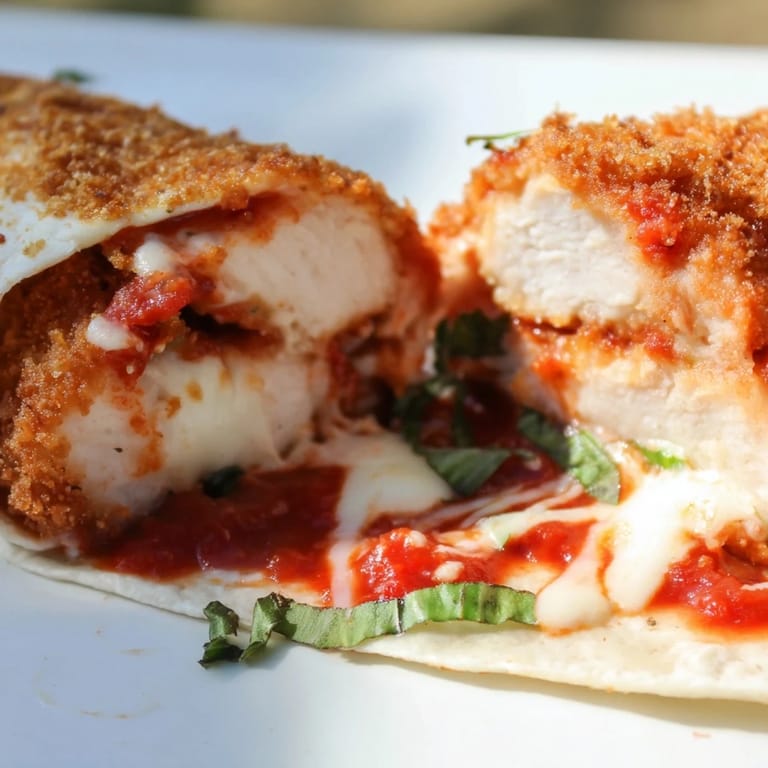
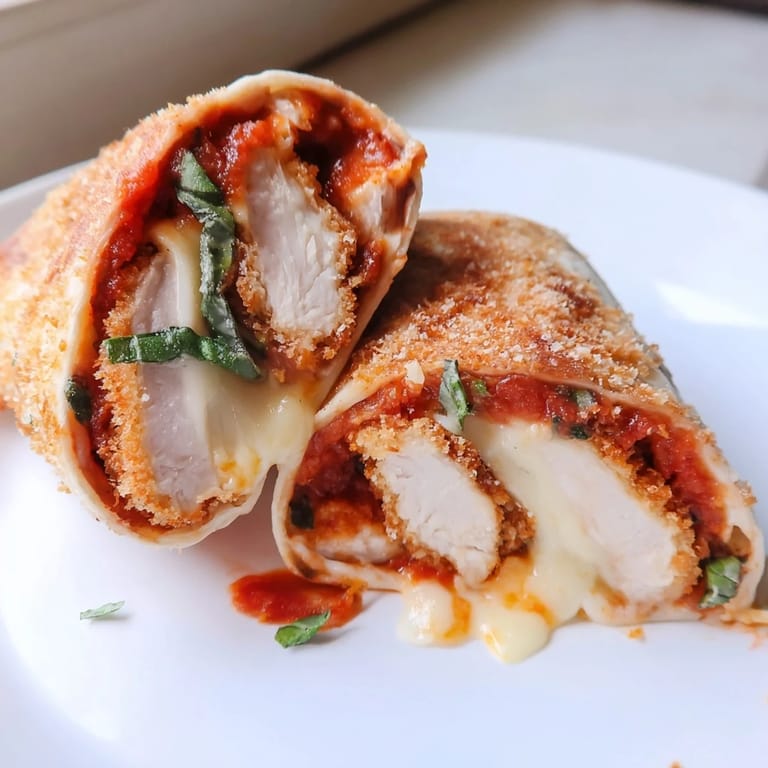
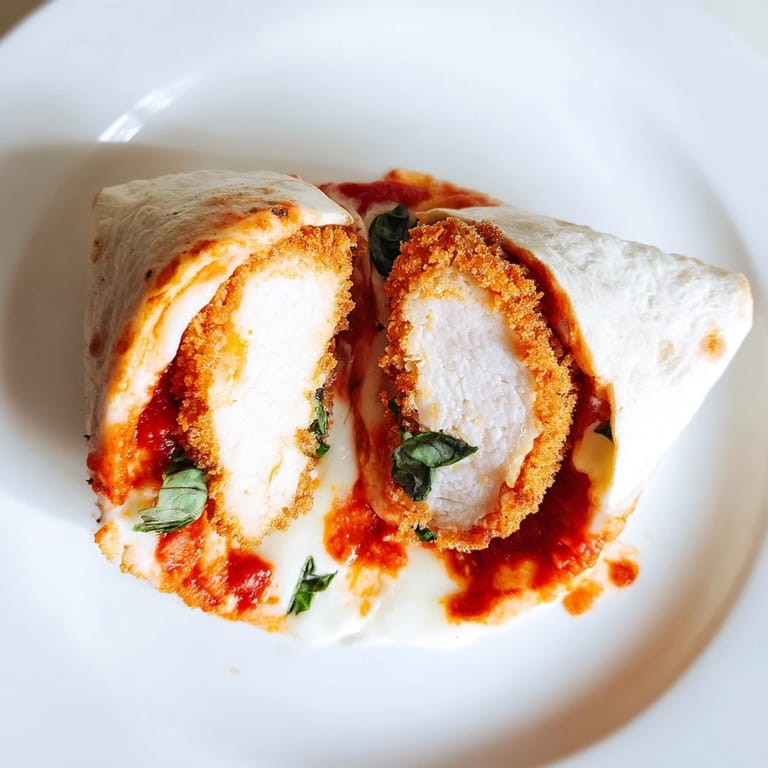
- Assemble the Wraps:
- Spoon about a quarter of the marinara sauce into the center of each tortilla, lay a crispy chicken cutlet on top, then sprinkle with mozzarella and fresh basil if using. Don't overload or it won't roll properly.
- Roll Them Up:
- Fold in the sides of the tortilla first, then roll it up tightly from the bottom, tucking as you go to keep everything secure. A tight roll is the difference between a wrap and a mess.
- Crisp the Wrap (Optional but Recommended):
- Place the wraps seam-side down in the skillet over medium heat for 2 to 3 minutes per side to crisp the tortilla and melt the cheese. This step takes them from good to unforgettable.
- Serve:
- Cut each wrap in half on the diagonal and serve with extra marinara sauce on the side for dipping. The sauce makes every bite even better.
 Save
Save One Saturday afternoon, my neighbor knocked on the door just as I was pulling these out of the skillet. I offered him half of one, and he stood in my kitchen eating it over the sink, nodding with his mouth full. He didn't say much, but he texted me two days later asking for the recipe. That's when I knew this wasn't just another dinner idea, it was something worth sharing.
Variations You Can Try
I've swapped in turkey cutlets when chicken wasn't on sale, and they worked beautifully with the same breading and frying method. For a lighter version, you can bake the breaded cutlets at 400°F for about 18 minutes, flipping halfway, though they won't be quite as crispy. Plant-based cutlets are another solid option if you're cooking for mixed diets, just adjust the cooking time based on the package instructions. Adding sautéed spinach or roasted red peppers inside the wrap brings extra flavor and a little color, and I've even tucked in some arugula for a peppery bite.
Serving Suggestions
These wraps pair perfectly with a simple Italian salad dressed in olive oil and lemon, something light to balance the richness. I've also served them alongside garlic knots or a quick caprese salad when I'm feeling fancy. A chilled glass of Pinot Grigio complements the tomato and cheese beautifully, though sparkling water with lemon works just as well. If you're feeding a crowd, set out extra marinara, mozzarella, and basil so people can customize their wraps as they go.
Storage and Reheating
Leftover wraps keep in the fridge for up to two days, wrapped tightly in foil or stored in an airtight container. To reheat, I skip the microwave and use a skillet over medium heat for a few minutes per side, which brings back some of that crispy texture. You can also freeze the breaded, uncooked cutlets for up to a month, then fry them straight from frozen, adding a minute or two to the cooking time. The wraps themselves don't freeze well once assembled, but the components do, so prep ahead and assemble fresh when you're ready.
- Store assembled wraps in foil to prevent them from drying out in the fridge.
- Reheat in a skillet, not the microwave, to keep the tortilla from getting rubbery.
- Freeze uncooked breaded cutlets on a baking sheet first, then transfer to a freezer bag to prevent sticking.
 Save
Save Every time I make these, I'm reminded that the best recipes are the ones you can eat with your hands and share without fuss. They're messy in the best way, and that's exactly why they work.
Questions & Answers
- → Can I prepare the chicken cutlets ahead of time?
Yes, you can bread the chicken cutlets up to 4 hours in advance and refrigerate them on a parchment-lined plate. Fry just before assembling the wraps for best crispness.
- → What's the best way to keep tortillas warm and pliable?
Wrap warm tortillas in a clean kitchen towel or place them in a tortilla warmer. Alternatively, warm them individually in a dry skillet over medium heat for 15-20 seconds per side just before filling.
- → Can I use chicken thighs instead of breasts?
Absolutely. Chicken thighs stay moist when fried and have excellent flavor. Simply slice them to similar thickness as the breasts and follow the same breading and frying process.
- → How do I prevent the wraps from falling apart?
Roll tightly and place seam-side down. For added security, pan-sear the wrapped tortillas for 2-3 minutes per side to seal the wrap and crisp the exterior while melting the cheese.
- → What oil is best for frying the chicken?
Use vegetable, canola, or light olive oil with a high smoke point. Avoid extra-virgin olive oil as it burns at lower temperatures. Heat to approximately 350°F for optimal crispness.
- → Can I make this vegetarian?
Yes, substitute the chicken with plant-based cutlets, thick slices of eggplant, or firm tofu. Bread and fry using the same technique for a satisfying vegetarian version.