Save
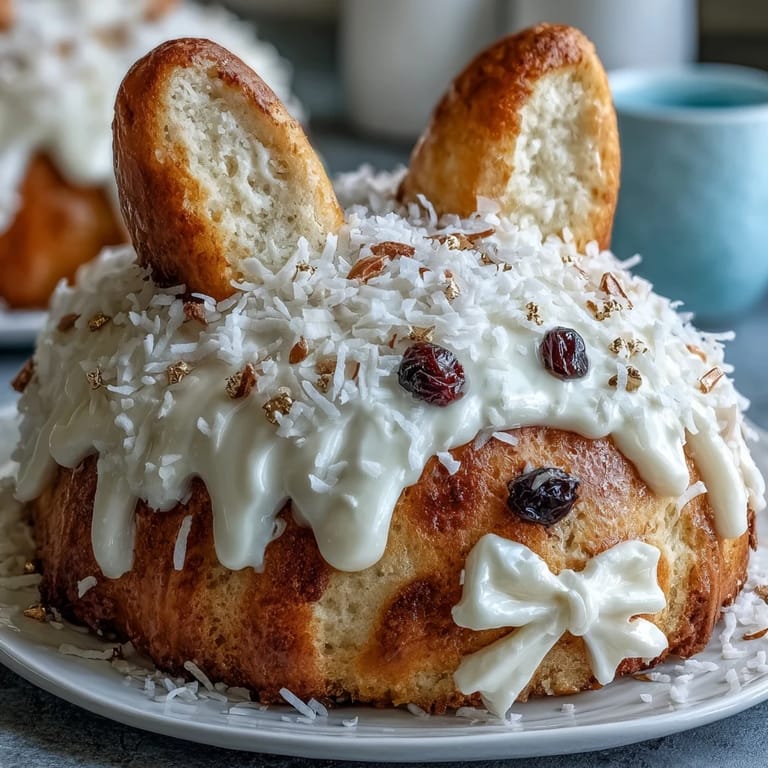
Save My daughter's eyes lit up when she saw the Easter bunny cake at her friend's party, and I knew right then I had to recreate that magic at home. There's something about a cake shaped like a fuzzy bunny with sparkling gold details that makes even the most skeptical kids believe in edible art. This whimsical vanilla cake turned out to be easier than I expected, though the assembly felt like playing with fondant and frosting instead of baking. The real joy came watching my family's faces when they realized the whiskers were licorice and the cheeks were marshmallows. Now it's become our Easter tradition, and I've made it so many times I could do it with my eyes closed.
I'll never forget the Easter Sunday when my nephew refused to eat anything except this bunny cake, demanding another slice before the main course was even served. His little hands kept pointing at the gold sprinkles, convinced they were actual edible treasure, and honestly, maybe they are. That moment changed how I think about holiday baking—it's not about perfection or picture-perfect presentation, it's about creating something that makes people happy enough to forget their manners.
Ingredients
- All-purpose flour (2½ cups): This is your cake's foundation, so measuring by weight if you have a scale makes a real difference in texture and rise.
- Baking powder (2½ tsp): Don't skip this or under-measure; it's what gives the cake its tender crumb and helps it rise evenly.
- Salt (½ tsp): A small pinch that somehow makes the vanilla flavor pop and keeps the sweetness from being one-dimensional.
- Unsalted butter (1 cup for cake, 1 cup for frosting): Room temperature butter is non-negotiable here; cold butter won't cream properly and you'll miss that fluffy texture.
- Granulated sugar (2 cups): Creaming this with butter for 3 to 4 minutes isn't just busy work—it aerates the batter and creates a lighter, more delicate crumb.
- Eggs (4 large, room temperature): Cold eggs won't incorporate smoothly, so pull them out of the fridge about 30 minutes before baking.
- Pure vanilla extract (1 tbsp for cake, 1 tbsp for frosting): Use the real stuff, not imitation; the difference is honestly night and day in flavor.
- Whole milk (1 cup): The fat in whole milk keeps the cake moist and tender, so don't swap it for skim.
- Powdered sugar (4 cups, sifted): Sifting removes lumps and makes frosting incredibly smooth; it's worth the extra minute.
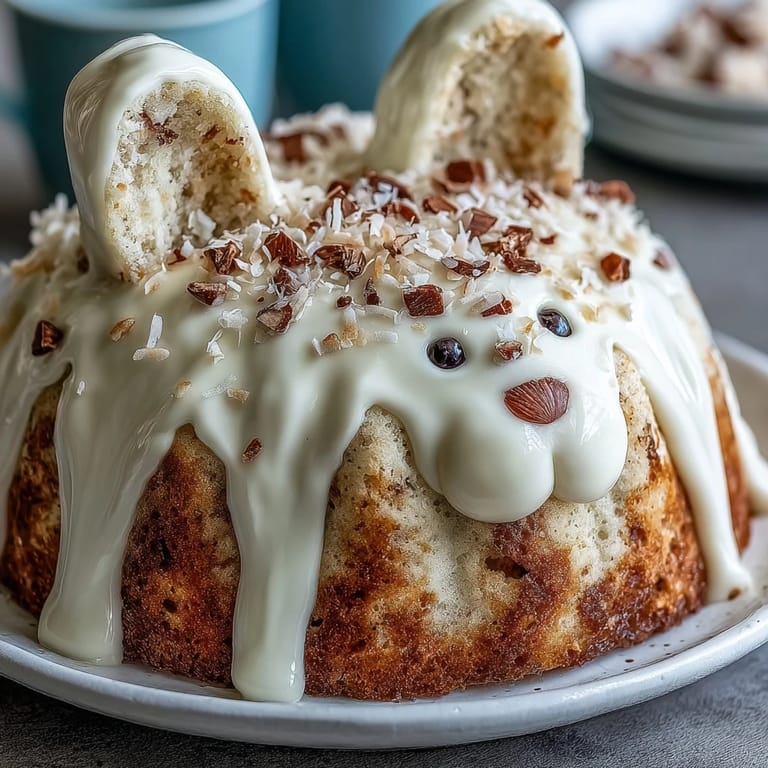
- Sweetened shredded coconut (1 cup): This becomes the bunny's fur, and toasting it lightly before applying gives extra flavor depth.
- Pink gel food coloring: Gel coloring is stronger than liquid, so you need less and it won't thin your frosting or coconut.
- Marshmallows (2 large, 2 mini): Large ones are the cheeks, mini ones are the teeth; they add whimsy and actual texture contrast.
- Black licorice laces or gel icing: These create the personality of your bunny, so choose whichever you can work with most easily.
- Gold sprinkles: The finishing touch that transforms it from cute to magical; don't be shy with them.
Tired of Takeout? 🥡
Get 10 meals you can make faster than delivery arrives. Seriously.
One email. No spam. Unsubscribe anytime.
Instructions
- Heat your oven and prepare the stage:
- Preheat to 350°F and grease two 9-inch round pans with a light coating of butter or cooking spray, then dust with flour so nothing sticks. This step sounds simple but skipping it means your beautiful bunny ears get stuck to the pan.
- Combine your dry ingredients:
- Whisk flour, baking powder, and salt in a medium bowl, making sure everything is evenly distributed so you don't end up with pockets of baking powder. I like to whisk this a few extra times to ensure the leavening agent is uniform throughout.
- Cream butter and sugar until fluffy:
- Beat them together for a full 3 to 4 minutes with an electric mixer; the mixture should look pale and almost cloud-like. This step is where the cake's tender crumb is born, so don't rush it.
- Add eggs one at a time with care:
- After each egg, beat well before adding the next; this prevents the batter from looking curdled and ensures even distribution. Adding them slowly is the difference between silky batter and lumpy batter.
- Fold in vanilla extract:
- Mix just until combined after adding the vanilla so you don't overdevelop the gluten and toughen the cake.
- Alternate wet and dry ingredients like a dance:
- Begin with the flour mixture, then milk, then flour again, mixing just until combined each time. Over-mixing at this stage creates a dense, tough cake, so be gentle.
- Bake with confidence:
- Divide batter evenly between pans and bake for 30 to 35 minutes until a toothpick comes out clean. The kitchen will smell incredible, and that's when you know everything is going right.
- Cool with patience:
- Leave cakes in pans for 10 minutes so they set slightly, then turn them out onto racks to cool completely; rushing this step can cause crumbs everywhere.
- Make your buttercream frosting:
- Beat softened butter until creamy, then gradually add powdered sugar, milk, vanilla, and salt, beating until it's fluffy and spreadable. The gradual addition prevents sugar clouds from exploding everywhere.
- Shape your bunny masterpiece:
- Place one cake round as the face, cut two ovals from the second round for ears, and arrange the remaining piece as a bowtie on a large platter. This is where your cake transforms into something magical and you suddenly feel like a real pastry chef.
- Apply a crumb coat first:
- Spread a thin layer of frosting all over the bunny shape, then chill for 20 minutes so crumbs don't mix into your final frosting layer. This extra step makes everything look professional.
- Frost with a generous, even layer:
- Apply thick buttercream over the crumb coat, using an offset spatula to create smooth, swooping strokes. This is where you can get creative with texture.
- Press on coconut fur:
- Gently press shredded coconut onto all the frosted areas, creating the illusion of a fuzzy bunny coat. Work in sections so the frosting doesn't dry out.
- Add pink details:
- Tint a small amount of coconut with pink gel coloring for the inner ears and nose area, then arrange with tweezers if needed. These little touches make it feel intentional and charming.
- Create facial features:
- Place marshmallows for cheeks and teeth, then use licorice laces or black gel icing for whiskers and eyes. Step back and look at your bunny's expression before declaring it done.
- Shower with gold sparkle:
- Sprinkle gold sprinkles liberally over the entire cake, letting some fall naturally for an organic, celebratory look. This is the moment where it stops being a cake and becomes an edible work of art.
 Save
Save There was one Easter when I made this cake at midnight because my niece asked me to, and I stood in my kitchen at 1 AM with flour on my nose, laughing at how absurd and wonderful it felt to be creating bunny magic for someone I loved. That cake became less about technique and more about showing up for people, and somehow that made it taste better.
Why This Cake Works Every Single Time
The vanilla cake base is actually forgiving because whole milk and butter create a moist crumb that stays tender even if you slightly over-bake it by a minute or two. The buttercream frosting is thick enough to hold the decorations without being difficult to spread, and it doesn't crack or tear when you're positioning those ears. What really makes this recipe special is that it looks complicated but the actual baking part is just a standard two-layer vanilla cake, so your stress level stays low and your confidence stays high.
Decorating With Heart Instead of Perfection
I used to worry about making the bunny shape look absolutely perfect until I realized that slightly wonky ears and a bowtie that's not quite centered actually adds to the charm and makes it feel handmade instead of store-bought. The beauty is in the details like marshmallow cheeks that sit a little crooked or gold sprinkles that cluster in unexpected places. When you're decorating this with someone else, especially kids, you're creating memories, not magazine covers.
Make It Your Own With These Easy Twists
The base recipe is flexible enough that you can customize it based on what you have on hand or what your family loves, whether that's swapping vanilla for almond extract or adding a chocolate layer for contrast. You can frost the entire bunny in white buttercream and use food coloring to paint details instead of arranging physical decorations, which is actually faster and lets you be more artistic. The most important thing is that you're creating something with your own hands, and that's what makes it special.
- For a chocolate version, replace ½ cup of flour with unsweetened cocoa powder and reduce the milk slightly since cocoa is drier.
- You can make this cake a day ahead and store it covered at room temperature, then frost and decorate on party day for less stress.
- Gold leaf or edible gold dust creates an even more luxe shimmer than regular sprinkles, though regular sprinkles are genuinely perfect too.
 Save
Save This cake is more than just dessert; it's a reminder that the best holiday traditions are the ones you create yourself, one slightly imperfect bunny at a time. Every time you make it, you're adding to a story that your family will remember forever.
Questions & Answers
- → What ingredients create the moist texture?
The combination of softened butter, eggs, whole milk, and vanilla extract ensures a tender and moist crumb.
- → How is the bunny shape formed?
Two cake rounds are used; one as the face, the second cut into ovals for ears and a bowtie, arranged on a platter.
- → What gives the cake its sparkling finish?
Shimmering gold sprinkles are applied over the buttercream after decorating to create a festive sparkle.
- → How do you create the fluffy fur effect?
Sweetened shredded coconut is pressed onto the frosting to simulate soft bunny fur.
- → Can this be stored after assembling?
Store covered at room temperature for up to 2 days or refrigerate up to 5 days to maintain freshness.